Table of Contents
- How to get started
- Know the differences
- Data Migration
- Sync Frequency
- Review Your Mailchimp Data
- Update your Mailchimp Templates for Klaviyo
- Say goodbye to Mailchimp.
- Start using Klaviyo
- Setting up your flows in Klaviyo.
- Send your first Campaign
- How Blend helped clients migrate from Mailchimp to Klaviyo
- How Blend can help you
If you’re a regular here on the Blend Blog, you’ll know we’re pretty obsessed with Klaviyo; with Industry ROI benchmarks like these, who wouldn’t be?
So after reading our copious amount of blogs on how much we love Klaviyo, you have decided that the time is now. You’re ready to migrate from Mailchimp to Klaviyo. But where do you even start?
To make your migration a little smoother, with a bit of help from Klaviyo, we have put together this handy Step-by-Step guide to make your transition into Klaviyo as easy as possible.

How to get started
Before you start your migration, we recommend cleansing and updating your current mailing list and deleting any subscribers who may have lapsed or are not engaging with your emails. Make sure you don't have any scheduled emails in Mailchimp before you start your migration, as Klaviyo will only sync the campaigns you have previously sent.
DON’T DELETE YOUR MAILCHIMP ACCOUNT
You will need to keep your Mailchimp account active for Klaviyo’s integration to work correctly. You will also need to access the account to retrieve various pieces of information and data. Keep your account active until you have safely migrated all of your data and confirmed that Klaviyo functions as it should.
Now you're ready to start migrating to Klaviyo!
Know the differences
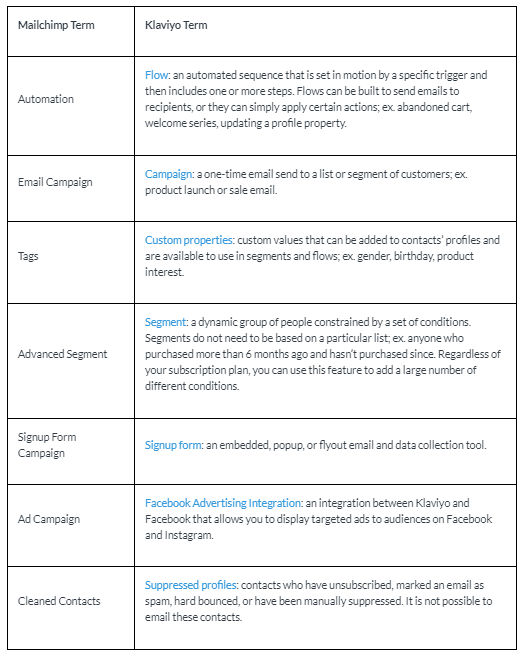
Before we start migrating from Mailchimp to Klaviyo, there are a few key differences we want you to know. Here are a few standard terms you might be used to seeing in Mailchimp and their Klaviyo counterparts that you will start seeing more regularly.
Data Migration
Update your Shopify Integrations
You'll want to ensure that your e-commerce platform (the tool you use to manage your online store) is no longer connected with Mailchimp before you complete the migration.
Integrate Klaviyo with Mailchimp
Integrating your Mailchimp account with Klaviyo pulls over all of your contact data, including when contacts received, opened, and clicked emails.
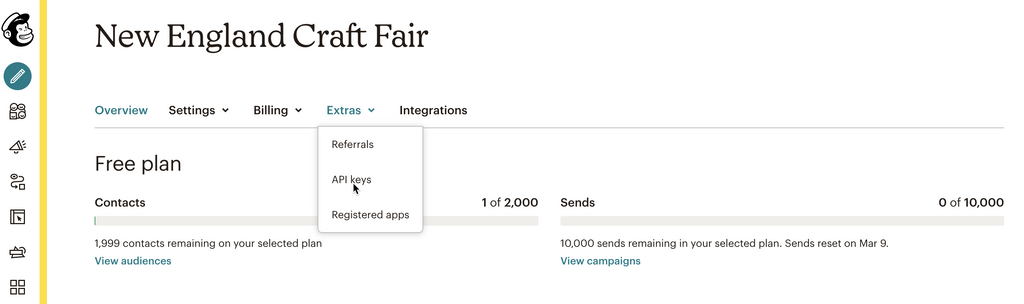
First, you'll need to obtain a Mailchimp API key. We recommend creating a new key specifically for the Klaviyo integration, but you can use an existing key if you would like. You can get your Mailchimp API key by logging into Mailchimp, clicking your account name in the bottom left, then navigating to Account > Extras > API keys.
Click Create a Key, then copy the key.

Once you have your API key from Mailchimp, go into the Integrations tab of your Klaviyo account. Here, search for Mailchimp on the All Integrations list. Click Add Integration and paste in the Mailchimp API key.

Once you've pasted in your API key, click to review the Advanced Options:
- Collect open and click data for MailChimp campaigns - check this option to sync MailChimp engagement.
- Create Klaviyo lists from MailChimp lists - check this option to sync all your existing MailChimp lists.
- Only sync specific lists - check this option to only sync specific MailChimp lists. You'll be prompted to choose which lists to sync.
Click Connect to Mailchimp, and your data will start syncing over within a minute or two.
Sync Frequency
After the first day of establishing an integration, Mailchimp data syncs to Klaviyo as follows:
- Existing lists sync every 30 minutes.
- Existing campaigns sync every hour.
- Every 6 hours, Klaviyo checks for new lists and campaigns. Once a new list or campaign is identified, they will sync every 30 minutes or 1 hour, respectively.
Review Your Mailchimp Data
Klaviyo pulls in the following data from Mailchimp:
- When someone received, opened, or clicked a particular email
- When someone subscribed to a synced MailChimp list
- Emails who have unsubscribed or bounced (these are added to your suppression list in Klaviyo)
- Existing lists in Mailchimp Contacts' Mailchimp Ratings
If a profile already exists in Klaviyo as an Active Profile before you add the Mailchimp integration, it will not be suppressed if it is suppressed in Mailchimp.
To suppress these contacts, you can export them from Mailchimp as a CSV and upload them to your suppression list in Klaviyo. Keep in mind that only names and email addresses of contacts will sync; to migrate over custom properties (tags) attached to contact profiles in Mailchimp.
|
Clicked Email |
The Mailchimp Clicked Email metric will track email click events synced from Mailchimp. To segment this metric further and see which contacts clicked which specific URLs in your emails, click on the Clicked Email metric within Metrics in your Analytics tab and then use the advanced filters option to filter by URL. |
|
Opened Email |
The Mailchimp Opened Email metric will track open email events synced from Mailchimp. |
|
Received Email |
Klaviyo will sync a Mailchimp Received Email event every time someone successfully receives an email sent from Mailchimp (meaning the email was delivered to their inbox). |
|
Subscribed to List |
The Mailchimp Subscribed to List metric indicates when a subscriber opts-in to a MailChimp list. You'll find the MailChimp Subscribed to List metric within Metrics in your Analytics tab. Event metadata includes the MailChimp List Name and the MailChimp List ID. |
Importing your Mailchimp tags into Klaviyo.
If you have used Mailchimp tags to label and organize your contacts, you will need to import these into Klaviyo manually. Start by exporting them from Mailchimp as a CSV and uploading them to your Klaviyo account.

Once you've exported your tags from Mailchimp, you can import them into Klaviyo as custom properties. Custom properties are attached to your Klaviyo profiles. You can create segments based on specific properties or use them to add filters to your flow or dynamically display data inside of your emails.
Update your Mailchimp Templates for Klaviyo
Klaviyo’s intuitive drag-and-drop template builder is a great way to recreate your Mailchimp template. Using the native builder ensures that your templates are mobile friendly, responsive, and user friendly.
However, suppose you don’t have time to dedicate to recreating your Mailchimp templates using Klaviyo’s template builder. In that case, our Klaviyo team is prepped to help you design and build the perfect Email Template that will connect with your audience.
You can also export your Mailchimp template as an HTML file and import them into Klaviyo, but first, you will need to update your template tags as Klaviyo won’t upload an HTML file with the incorrect tag.

The tag that is most important to swap out is the unsubscribe tag. Before you import your template into Klaviyo, you will have to add an {% unsubscribe %} tag because Klaviyo does not allow you to upload HTML templates that don't have unsubscribe tags unless they're for transactional emails.
Check out this handy chart from Klaviyo with common Mailchimp tags and their corresponding tags in Klaviyo.
|
Mailchimp Tag |
Klaviyo Tag |
|
*|UNSUB|* |
{% unsubscribe %} |
|
*|FNAME|* |
{{ first_name }} |
|
*|LNAME|* |
{{ last_name }} |
|
*|LIST:COMPANY|* |
{{ organization.name }} |
|
*|EMAIL|* |
{{ email }} |
|
*|UPDATE_PROFILE|* |
{% manage_preferences %} |
|
*|MC:SUBJECT|* |
This is the subject line of the email, which is set on a per-email basis in the Klaviyo template editor. |
|
*|MC_PREVIEW_TEXT|* |
The email’s preview text is set on a per-email basis in the Klaviyo template editor. |
Learn more about template tags in Klaviyo.
Once you've swapped out the tags for Klaviyo tags, you can save your HTML file.
Say goodbye to Mailchimp.
After you've moved all your data over to Klaviyo, there are three key steps you can take to ensure that you no longer need your Mailchimp account: Ensure that your signup forms and list growth tools point to Klaviyo, not Mailchimp Recreate your automations as flows in Klaviyo Remove the Mailchimp integration
Sign-Up Forms
If you have any signup forms in Mailchimp, you will not be able to redirect these to Klaviyo, but you will want to ensure that these are recreated in Klaviyo so that your list continues to grow.
- Use the Klaviyo Signup Form Builder to re-create your forms from scratch
- Use a third-party list growth tool that integrates with Klaviyo
- Integrate your custom form through your e-commerce platform
If you are using a third-party list growth tool instead of Mailchimp's built-in form builder, make sure that this syncs to Klaviyo. Klaviyo integrates with several third-party list growth tools. Scan our list of integrations to find the device that you're using. If you don't see it listed, consider using Klaviyo's native Signup Form Builder to create your forms or switching to a different third-party tool.

After switching all your signup forms to point to Klaviyo, wait a few days and watch your lists in Mailchimp. If you notice subscribers are still being added to these lists, there's probably at least one form that still needs to be swapped out. Now that you’re confident that your signup forms have all been switched off, it’s time to turn off your Mailchimp signup forms. To do that, head to the code of the page where you installed the form and remove the code that begins with

Start using Klaviyo
Now that you no longer need your Mailchimp automation, recreate them as flows in Klaviyo and then turn them off in Mailchimp. This will prevent you from sending emails to your audience twice.
Turn off your Mailchimp automations by clicking Pause and Edit next to the campaign and selecting Pause.
Setting up your flows in Klaviyo.
Now that you have fully set up your Klaviyo account, we recommend creating a series of flows to get in touch with your customers at different parts of their buying journey, integrate your account with additional platforms and begin testing and reporting on by A/B testing and using Klaviyos advanced reporting features.
Klaviyo’s recently launched Reports Library comes with a variety of pre-built reports to analyse your data, revenue, and growth.
At Blend, we have a Core List of flows we believe every Klaviyo account should have to maximise their email marketing. These include:
- Welcome Flow
- Post Purchase Flow
- Abandoned Checkout Flow
- Browse Abandoned Flow
- A Series of Winback Flows
- Predict Next Order Flow
It’s also essential to consider creating flows for whatever apps and integrations you have in your Shopify Store like Loyalty Lion, Octane AI, and ReCharge.
Take a look at our Klaviyo Nucleus Approach for our recommendations of what we think will help scale your growth and revenue in Shopify and Klaviyo.
Send your first Campaign
For deliverability reasons, we recommend sending to a highly engaged group of contacts for your first four weeks on Klaviyo. This will ensure that you start off on the right foot with Klaviyo and train inbox providers like Gmail, Yahoo, etc., to place your emails in the inbox. Klaviyo pulls in contacts' "Mailchimp Ratings," which rate a contact's level of engagement on a scale of 1-5 stars. Five being subscribers that are most engaged and one being those who aren’t engaged at all.
You’ll need to build a segment of engaged subscribers before sending your first campaign.
Klaviyo provides a default Engaged (3 Months) segment that will appear in the Lists & Segments tab. You can use this as a starting point and then decrease the timeframe to 30 days and add historical Mailchimp engagement criteria to ensure that you’re reaching the right audience.

Remove Mailchimp integration
Once you’ve pointed all of your list growth tools to your Klaviyo account, paused your Mailchimp automations, and turned your Klaviyo flows live, you can remove the Mailchimp integration.
Before you remove your Mailchimp integration, make sure to double-check that everything is working as expected. Send a few test emails from Klaviyo to ensure everything functions correctly and that you’re good to go.
Once you've taken these steps and are fully migrated to Klaviyo, you can go ahead and remove your Mailchimp integration. Click on the Integrations tab and select Settings under your Mailchimp integration. Select Remove in the upper right and confirm that you want to remove the integration.

How Blend helped clients migrate from Mailchimp to Klaviyo
Over the past few years, we’ve helped a number of Shopify brands migrate from Mailchimp to Klaviyo. Read more about our client NI Candle Supplies here.
How Blend can help you
Not only is our Klaviyo Team equipped to help you build and grow your email marketing, but we are ready to support your journey from Mailchimp to Klaviyo so that you can have the peace of mind (and time) to focus on the areas of your business that require your undivided attention.
Ready to migrate?
Book a call with us.